To our EU Readers

To our EU Readers: We use cookies to ensure that we give you a good experience on our blog. If you continue to use this site, that constitutes your agreement.

Thursday, September 25, 2014

Pocket Card Tutorial with free cut file

Today I'm excited to share with you a pocket card tutorial.  On a previous post, I shared a couple of pocket cards I made for Christmas.  I realized those were pretty small for normal card envelopes, but they fit perfectly in some extra smaller envelopes I had around from a previous Christmas.  So I decided to make a new template that fits better in a normal card envelope.  Due to my lack of math skills, it took a few tries, but here is what I came up with.  This is also my first picture tutorial so be patient with me. :)

[UPDATE: I created a free silhouette cut-file, click here]

Here is the finished card...


To start with, you'll need a piece of paper (double sided patterned works well) 8 5/8" x 6".

Turn the paper horizontally and using a scoring board, score down at 3/8" .


 Next, you'll score at 4 1/2"


 Then turn the paper vertically and score at 5/8".


Then you'll cut off the tiny bottom corner where the two flaps meet, and the portion on the right bottom side where the 4 1/2" score line and 5/8" score line meet.  This will create your flaps to close the pocket.


 Next you'll fold on the 4 1/2" score line (using a bone folder if you'd like).  You can also fold in the side and bottom flaps.


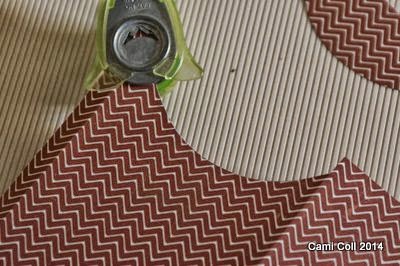
Now to create the curve in the front, I used a CD. You could use a circle die if you have one large enough (I didn't).  Or anything round (plate, lid, etc).  You can make the curve close to the top or further down depending on your preference.  I wanted some of the tag to show, so I put it down a couple of inches and then traced the bottom edge of the CD.


Next I cut off the part I just traced, with a straight line across the left flap and up the right side.  Keep this piece of paper for the tag that goes inside the pocket.


 Next we'll round the corners.  Start with the top of the left flap, then the bottom of that flap (you'll need to fold the bottom flap up to get the corner rounder in there).

Then you can do the bottom flap...


...and the top(back of envelope). Here's how the top will look once that is done.


Next we'll put some sticky strip or (scor-tape like I used) on the flaps.


Go ahead and remove the backing, and fold down the flaps.  This is the back of the pocket.  You could either have them showing like I do (hard to tell in the photo, sorry) or hidden like in other example below.


The pocket on the right has the flaps tucked inside, where the one on the left has them outside (visible).

Ok, so now you have your pocket, and you can decorate it however you choose.  
I decided on this one to put a snowflake in the corner.  It's actually two snowflake punches stacked on top of each other, with a pearl sticker on top.  I put a dimension dot on the bottom and in between the snowflakes for some height.  I also ran both snowflakes through the Big Shot with my Stampin Up! Chevron embossing folder.


Next comes the tag that will go inside the pocket. For this, you'll need a piece of cardstock 5 1/4" x 4".  I rounded the corners, then put a 1 1/2" circle of one patterned paper covered with a 1" circle of contrasting paper and folded in half over the top edge.  I used the scrap of paper left over after the CD tracing step for the circles.
Then I hole-punched through the center of the half-circles and added a ribbon. 
  

Another idea I tried is only rounding the top corners and then using an edger punch on the bottom.  This is a scroll punch from EK Success.


You can add a sentiment like I did on this one (oh, and I did a Christmas tree in the corner of this one)...


 ...or this one... (with a poinsettia sticker on the front).


Here are 3 finished pocket cards.  You can see the possibilities are endless, and can be used for any theme.  I think I'll try some for fall next...


 Thanks for stopping by, and please leave a comment if you enjoyed this.  I'd love to see your creations as well.


Monday, September 22, 2014

The latest...

I've been having some fun making Fall and Christmas cards lately... figured I might as well get started on them since I always have trouble finishing them up in time.  The first one is a freestanding pop-up card.  I found the tutorial for this here.


I love that it folds flat for mailing and fits in a regular card envelope.  Yet once opened, it makes such a statement!  
 This one I cased from the new Stampin' Up Holiday catalog.  I just cut out the wreath form that came with my Silhouette Studio software in two sizes and found a fun font to cut out "Joy" in metallic gold paper.  I used a wood-grained embossing folder for the white banner and some Christmas themed paper for the red banner and background paper.
 For this card, I found my inspiration here.  I used my Fiskar's Cloud punch to make the ice cream scoops, freehand cut the cone and printed the sentiment out on my printer.
 This next one is a fun new idea I tried after receiving one similar to it (baby themed) and making a template from it.  I'll call it a pocket card, and it's really quite easy once you figure out the measurements.   I love that it can go for any theme as well.
Here it is with the tag removed.  I love the double-sided Christmas paper I got last year.  The poinsettia sticker was an easy decoration for the front of the pocket.  


Here it is with a different Christmas paper and stamp.

For a photo tutorial, head over here.

Here's a side-step card I created for a birthday.  I found my inspiration here.
 This fall card has a sort of rustic feel.  I got my inspiration here for this one and the next card too.


For this one, I got my inspiration here.  I used the cloud punch again for the cupcake.  Love that it's so versatile.

 Thanks for stopping by!


Saturday, August 30, 2014

Fall Cards

Well, I can't believe summer is over and school has already begun around here.  I've been having fun trying out my silhouette portrait some more this week and thought I'd share...

For this one, I found my inspiration here.  I cut my own grass rather than tearing the paper, and added some clouds from my Fiskar's cloud punch.

 This one is on a flat card and the red part opens up (see photo below).

 The inspiration for this one I found here.  It turns out the circles are made of veneer and you can't buy a die, so I just made a bunch of circles with my silhouette studio software and created my own background.  Next time I would probably use thicker paper or layer it a few times so it doesn't look so flat.  I ended up running it all through the Big Shot with the large polka dot impression folder so it would have some texture.  If you'd like the cut file, leave a comment with your email address and I'd be happy to send it to you.  It can be resized, which I will be doing to make it a bit smaller so it'll fit on the card better.
 The inspiration for this one I found here.  I had a long chevron cut file rather than the individual ones, so I changed it up a bit.
 With the left-over scraps from the previous card, I made this one.
Thanks for stopping by!  Please leave a comment.  :)

Wednesday, August 27, 2014

Puff Quilt

Well, I've finally finished the puff quilt I've been working on for the past 3 years (shaking head in shame).  I just about gave up a few times when I didn't know how to finish the edge/back.  But I'm so happy I didn't give up and now I have it hanging on the wall in the nursery.


Saturday, August 2, 2014

August Cards

Having fun with my Silhouette portrait and all the fun fonts available online.  Love the honeycomb and chevron embossing folders from Stampin' Up!


'


 This is a baby-themed card-in-a-box for a friend of my husband's baby girl.  I used stickers since I don't have many baby-themed stamps (and it's faster).  My two-yr-old loves it and wants to play with it, so I need to get it in the mail soon!


and some I made for Father's Day...


Thanks for stopping by!

Friday, May 2, 2014

Card in a Box fun!!

A week or two ago, I saw a cute card in a box and decided to give it a try.  The first one didn't go quite as well as I hoped, but once I got the system down, it got pretty easy and I was hooked!  I made a couple for Mother's day, one for my brother birthday (a sports fan), and then I tried a different kind of pop-up card that was also a blast.

The tutorial for the card in a box I used was a different one because that one was translated into English and I wanted to use inches rather than centimeters since my ruler didn't have both.  The youtube video is here     The sound was very quiet on my computer, so I wrote down the dimensions so I would have a quick reference for the following times I made the card in a box.

Here's the 1st one I made....


Then I tried this Easter one.  I saw that some people used transparency sheets to make things "fly", so I tried a strip from that to make the butterfly "fly".  The cards fold flat and can be sent in a regular card envelope.  yeah!


Next I tried this modern looking one that goes with the style of my M-I-L's decor.


And this one for my brother's birthday...


The tutorial I used for the pop-up card I found here.  I also looked on splitcoaststampers.com and there were tons of fun ideas for these as well.  Yeah!  

 These also fold flat for mailing... like this-

Here's another for Mother's day...


 I also had a new nephew born, so I made this cute dresser card for his arrival.  I used this card for my inspiration, and found a tutorial for the side step card  here.

Thanks for stopping by!