To our EU Readers

To our EU Readers: We use cookies to ensure that we give you a good experience on our blog. If you continue to use this site, that constitutes your agreement.

Monday, June 15, 2015

Heatwave

We had temperatures in the 100's last week so I spent most of my time indoors to avoid the heat.  Oh, darn - an excuse to make cards.  I don't know how people ever get bored, because as a crafty person, there is never enough time to make all the crafts and cards I have in mind.  :)  

The first is just a simple one using Birthday Wishes (by Pebbles) paper and coordinating die cuts.  I added wink of stella to the top of the party hat for some shimmer.


 This next one is inspired by all the diagonal cards coming out lately and the sentiment splits by Papertrey Ink.  I just cut the paper at a diagonal since I don't have the specific dies.  The flowers are die cuts from Essentials by Ellen.  The sentiment is a rub-on from Pebbles.


Here is another version of it.  I cut out some flowers on my silhouette and the sentiment is a rub-on from Pebbles.


This card just looks so summery and happy to me.  I got the inspiration for 
it here.


 ...and here is another verison using a smaller button on the "sun".


The inspiration from this one came from here.


 The inspiration for the three following ones came from here.  I just thought the layout was so cute and after trying one card I had to try a couple more.  I can see many possibilities with this one in the future too.


For this one I cut out the strawberry using clip art and my silhouette.  


The owl stamp is from Stampin' Up Fox & Friends, and the sentiment is from Simon Says Stamp.


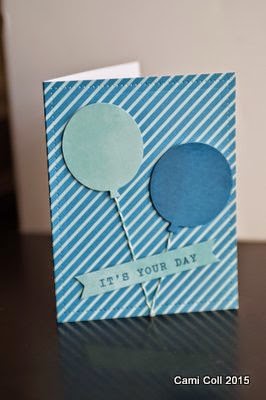
This one is a fun spinner card.  I haven't used them in a while so I thought it was time to pull them out again and try something new.  The stamp is from Stampin' Up (Take a Spin) and the banner punch below as well.


This is another card featuring Stampin Up's Fox and Friends set.  So cute!  I found my inspiration here.  This sentiment is also from Simon Says Stamp (Big Birthday Wishes)


Lastly, I used the die cuts from Pebbles to make this fun party card.  The ballon ties and tails are rub-ons from Quikutz but I don't think they are in business any longer.  :(  


Tuesday, May 26, 2015

Fun Times

I finally got some time to stamp the past couple of weeks and got together with my mom who also enjoys making cards.  Good times!
These first two cards use some diecuts and paper from Pebbles among others.  I loved the stamp "Just one more candle", so I found a way to include that on both cards.  The stamps are from Simon Says Stamp.


I had a birthday last week and with that arrived some new stamps.  Fun!  I love trying out new stamps and looking for more ways to use them on Pinterest (of course).  

 The inspiration for this one I found here.  I don't have very many good flower stamp images, but I love the dimension the die-cut flowers provide anyway.  


This card was inspired by this one.  I didn't have that embossing folder or colored paper, but I love how it turned out with the chevron embossing folder.  Fun and cheery!

 This fun diagonal card I saw here and just had to try with my new Thanks and "berry much" stamps (and Strawberries, of course!)  


This one was supposed to use the petite pennants builder punch, which I also have, but the pennants were a little too big to fit on the card, so I substituted the banner punch instead.  I found it here.


Did I mention I love strawberries?  This is my new set called "Simply Scrumptious" by Clearly Besotted (Simon Says Stamp).  I love the other looks they got with these stamps trying watercolors so I'll have to try something new next...  The inspiration for this one is from here.  So summery!


And speaking of Summer, what's a summer without a trip to the beach.  We finally went last weekend after wanting to go for ages.  It was cold and windy, but it was still nice to get away from house projects and everything and just go...


Thanks for stopping by today!  

Tuesday, February 24, 2015

The latest...

I've been working on a few sets of cards for gifts this week, so I thought I'd share them.  I used my silhouette portrait to cut out the fonts- love that I can make them whatever size I need.  :)


This one is pretty self-explanatory.  Love the banner punch from Stampin' up.  Probably my most used item.

 This card has a cute little pocket on the front.  I think I'll make it a little bit smaller next time, but like the idea.  I was inspired by this one here.


 Here is another pocket card I made for Valentine's day but forgot to post previously.  I didn't have double-sided paper so I just glued the gingham to the inside of the pocket so it would match the banner down below.  


 This is how it looks with the tag inside.  For the tutorial on pocket cards, go here.


 I found the inspiration for this one here.  


And for this one, I found the inspiration here.  It's funny 'cause I love cupcakes so much on cards, even though I don't really like to eat them... but I'm not much of a cake person, so I guess that's why.  


And that one led to this one...


This one was just simple- throw the thanks in the middle and you're done... :)


What kind of cards do you use the most?  

Friday, February 13, 2015

Springtime

Some of you may still be having winter weather, but where I live, the daffodils have started blooming this week, the trees have been in bloom for about a month now, and it's in the 70's today.  Wow.  Seems pretty nice for mid-February.  But after a year and a half in Alaska where it didn't get this nice ever until June or July, I am still amazed at our early Spring.  

I have a few sets of cards to make for gifts lately, so I've been having fun playing around with all-occasion-type cards.  

I found the inspiration for this one here.  Love the word bubbles that are so popular lately.

For this one, I found the inspiration here.

The inspiration for this one is here.  I love the Thanks die.  I used some wink of stella on the hearts and shimmer mist on the whole card to give it a sparkle that the camera didn't catch.  


I've seen quite a few lately with the diagonal look, so I tried my hand at it too.  


I've also been having some more fun with pocket cards.  For the tutorial, go here.  I love that there are so many holidays coming up where I can have an excuse to make cards.  Valentine's Day and St. Patrick's Day are my current focus but I also needed some for every day stuff.   

This one uses the popular cloud and sunshine idea.  I used the Stampin' up banner punch for the sun "rays" and a Fiskars cloud punch. 


Here it is with the tag removed.  


 Then I thought it'd be fun to do one for St. Patty's day.  I had a scrap of rainbow paper I thought would be perfect because of the rainbow/pot of gold tradition.  For the fold-down top pocket card tutorial, go here.


 Here it is with the tag removed.  I will probably add another sentiment before sending, but didn't decide on one yet.  


Then I thought, while we're going with St. Patrick's Day, why not a Leprechaun style card? 


 I still wanted a hint of the rainbow theme but decided on rainbow polka dots for the tag inside.

What is your favorite holiday to make cards for?  Which pocket card style do you like better?

Thanks for stopping by today!

Monday, January 5, 2015

Long Pocket Card Tutorial

Well, it's taken me awhile, but I finally have a pocket card tutorial for the long pocket card.  For the regular card size, go here.  On my original post about the long pocket card, I explained how I had a lot of pretty business sized envelopes, so I decided to come up with a card that would fit in those envelopes.  To see my Christmas themed long pocket cards, go here.


Here is a pocket card I made for Valentine's day.

For this, you will start with a piece of cardstock 8 1/2" by 9 1/2."  You will score on the 8 1/2" side at 4" and 8".  You will score on the 9 1/2" side at 1/2".  Here is what the paper looks like when it is scored.


 I then folded on all the score lines to decide where I wanted the front of the pocket to be.  I then removed the bottom left and bottom right pieces (see below) by cutting them out.
 If you like the fold down flap of the Valentine card above, then you can simply score at 1/2 inch or 3/4 inch below the top of the pocket.  However, with this card, I decided to make the pocket have a rounded top like in the style I did at Christmas time for the regular card-sized pocket.  I took a CD and lined it up about half way on the top of the card.
 I traced the arc with a pencil...

 This is what it looks like when that portion was removed.
 Here is the pocket unfolded so you can see how that portion is removed.  I also cut the right side down so it won't show when the pocket is folded down.
 Then I used a corner rounder to make this:
 The pocket is now ready to decorate.  I decided to add some stripes of the same paper to the tag which will go inside the pocket.  The tag is 3 3/4" by 8 3/4".  I rounded the top corners but left the bottom corners intact.  

Here is how it looks decorated:


I used some "Pebbles" Birthday Wishes diecuts for the cupcake and "let's party" banner.  The other banners are the Stampin' Up Banner punch.  The sentiment, Happy Birthday, is a Pebbles Rub-on.  I just happened to have a small cupcake sticker that matched the large cupcake so I used that on the tag to coordinate.


Here are some other cards I've made lately:


This one also uses the Stampin' up Banner punch and another rub-on from Pebbles


This one used more diecuts from Pebbles Birthday Wishes and some bakers twine for the balloon strings


Just can't get enough of banners lately! :) 


 This one I found and cased from here.  I didn't have the exact same papers or stamps so I did my best to work with what I had.  

Thanks for stopping by!


Saturday, January 3, 2015

Happy New Year 2015!

I thought I'd start the new year out with some thank you cards since I needed to make some for the Christmas gifts we received.  I came across my stash of rub-ons and decided to use those for some of my cards.  As much as I like stamping, I like the no-clean-up-reqired easiness of using  a rub-on.

flower die- Floral Fusion (Stampin' Up)

 Banner punch- Stampin' Up, Label Die, Stampin' up


Thanks die, Simon Says Stamp

I love this bicycle die and especially in red- I always wanted a red bike as a kid and finally got one as an adult.  :)