To our EU Readers

To our EU Readers: We use cookies to ensure that we give you a good experience on our blog. If you continue to use this site, that constitutes your agreement.

Friday, February 13, 2015

Springtime

Some of you may still be having winter weather, but where I live, the daffodils have started blooming this week, the trees have been in bloom for about a month now, and it's in the 70's today.  Wow.  Seems pretty nice for mid-February.  But after a year and a half in Alaska where it didn't get this nice ever until June or July, I am still amazed at our early Spring.  

I have a few sets of cards to make for gifts lately, so I've been having fun playing around with all-occasion-type cards.  

I found the inspiration for this one here.  Love the word bubbles that are so popular lately.

For this one, I found the inspiration here.

The inspiration for this one is here.  I love the Thanks die.  I used some wink of stella on the hearts and shimmer mist on the whole card to give it a sparkle that the camera didn't catch.  


I've seen quite a few lately with the diagonal look, so I tried my hand at it too.  


I've also been having some more fun with pocket cards.  For the tutorial, go here.  I love that there are so many holidays coming up where I can have an excuse to make cards.  Valentine's Day and St. Patrick's Day are my current focus but I also needed some for every day stuff.   

This one uses the popular cloud and sunshine idea.  I used the Stampin' up banner punch for the sun "rays" and a Fiskars cloud punch. 


Here it is with the tag removed.  


 Then I thought it'd be fun to do one for St. Patty's day.  I had a scrap of rainbow paper I thought would be perfect because of the rainbow/pot of gold tradition.  For the fold-down top pocket card tutorial, go here.


 Here it is with the tag removed.  I will probably add another sentiment before sending, but didn't decide on one yet.  


Then I thought, while we're going with St. Patrick's Day, why not a Leprechaun style card? 


 I still wanted a hint of the rainbow theme but decided on rainbow polka dots for the tag inside.

What is your favorite holiday to make cards for?  Which pocket card style do you like better?

Thanks for stopping by today!

Monday, January 5, 2015

Long Pocket Card Tutorial

Well, it's taken me awhile, but I finally have a pocket card tutorial for the long pocket card.  For the regular card size, go here.  On my original post about the long pocket card, I explained how I had a lot of pretty business sized envelopes, so I decided to come up with a card that would fit in those envelopes.  To see my Christmas themed long pocket cards, go here.


Here is a pocket card I made for Valentine's day.

For this, you will start with a piece of cardstock 8 1/2" by 9 1/2."  You will score on the 8 1/2" side at 4" and 8".  You will score on the 9 1/2" side at 1/2".  Here is what the paper looks like when it is scored.


 I then folded on all the score lines to decide where I wanted the front of the pocket to be.  I then removed the bottom left and bottom right pieces (see below) by cutting them out.
 If you like the fold down flap of the Valentine card above, then you can simply score at 1/2 inch or 3/4 inch below the top of the pocket.  However, with this card, I decided to make the pocket have a rounded top like in the style I did at Christmas time for the regular card-sized pocket.  I took a CD and lined it up about half way on the top of the card.
 I traced the arc with a pencil...

 This is what it looks like when that portion was removed.
 Here is the pocket unfolded so you can see how that portion is removed.  I also cut the right side down so it won't show when the pocket is folded down.
 Then I used a corner rounder to make this:
 The pocket is now ready to decorate.  I decided to add some stripes of the same paper to the tag which will go inside the pocket.  The tag is 3 3/4" by 8 3/4".  I rounded the top corners but left the bottom corners intact.  

Here is how it looks decorated:


I used some "Pebbles" Birthday Wishes diecuts for the cupcake and "let's party" banner.  The other banners are the Stampin' Up Banner punch.  The sentiment, Happy Birthday, is a Pebbles Rub-on.  I just happened to have a small cupcake sticker that matched the large cupcake so I used that on the tag to coordinate.


Here are some other cards I've made lately:


This one also uses the Stampin' up Banner punch and another rub-on from Pebbles


This one used more diecuts from Pebbles Birthday Wishes and some bakers twine for the balloon strings


Just can't get enough of banners lately! :) 


 This one I found and cased from here.  I didn't have the exact same papers or stamps so I did my best to work with what I had.  

Thanks for stopping by!


Saturday, January 3, 2015

Happy New Year 2015!

I thought I'd start the new year out with some thank you cards since I needed to make some for the Christmas gifts we received.  I came across my stash of rub-ons and decided to use those for some of my cards.  As much as I like stamping, I like the no-clean-up-reqired easiness of using  a rub-on.

flower die- Floral Fusion (Stampin' Up)

 Banner punch- Stampin' Up, Label Die, Stampin' up


Thanks die, Simon Says Stamp

I love this bicycle die and especially in red- I always wanted a red bike as a kid and finally got one as an adult.  :)

Monday, December 1, 2014

Christmas Cards

Now that it's finally after Thanksgiving I don't feel so bad about ONLY making Christmas cards for the next little while.  I still have a ways to go, but wanted to share some of the latest.

I decided to play around some more with the pocket card idea.  I have several metallic letter-sized envelopes I never use...so I thought I'd make a letter-sized pocket card as well. (Tutorial coming soon!)


I also finished up some of the smaller ones I was working on (tutorial for these here)


I'm having so much fun with my Silhouette portrait!  If you are thinking about getting one, I highly recommend it.  I love that you can download all the free fonts online and then cut them out with the Silhouette.  Such fun!

The inspiration from this card came from here.


I am adding to my collection of Spectrum Noir markers, so I couldn't wait to try something with red and green.  I love these markers, and the fact that they are so much less expensive than Copics!


Here is a simple card with the true meaning of Christmas.  I love Nativity Scenes and have been collecting them for years.  One of my favorites is an igloo with eskimos from Alaska where I served as a missionary a few years back.

This is a very simple one using two dimensional stickers.  I just drew in some gold lines to make the ornaments hang, and cut the text out on the Silhouette.

Thanks for stopping by and have a Very Merry Christmas!


Tuesday, September 30, 2014

Pocket card variation (with tutorial)

Today I have another version of the pocket card to share with you.  This one has a fold down flap in the front instead of the curved front I shared a couple of days ago and it's even easier to make!  


To start with, you'll need a piece of paper (double sided patterned works well) 8 1/2" x 5 3/4".


Turn the paper horizontally and using a scoring board, score down at 3/8" and 4 1/2" .

Then turn the paper vertically and score at 5/8".


Next you'll score at 5" just down to the line you made at 4 1/2" horizontally.  (This will create the fold down flap in the front).


Then you'll cut off the tiny top corner where two flaps meet, the tiny bottom corner where two flaps meet, and the portion on the right bottom side where the 4 1/2" score line and 5/8" score line meet.  Cut down the 4 1/2" line just until you meet the top horizontal line.  That will create your fold down flap for the front.  Here's what it should look like when you've done all these steps (the last one isn't visible in the picture):


Next you'll use a corner rounder and round all the corners (flaps included) except the bottom right corner.  You'll need to fold your flaps in to get to various corners to use your corner rounder.  I left the front flap folded downward.  It will look like this:


Next you're ready to assemble the pocket with adhesive.  I used scor-tape.  You could use sticky strip or whatever you prefer, but I tried the snail adhesive previously and it wasn't strong enough to hold the flaps closed.  You can either have the flaps hidden or showing.  I preferred hidden, like this:


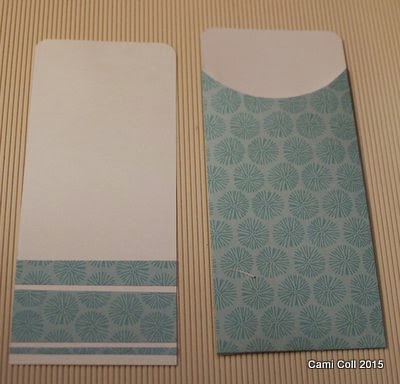
Here is the front of the pocket, ready to decorate


The tag is simple- just a piece of cardstock 3 3/4" x 5" with the corners rounded.  I used a 1 1/2" circle and 1" circle of plain or patterned paper for where the ribbon goes through.  I scored each of them down the middle, put adhesive on the back and centered them on the tag.  Then I hole-punched through and added my ribbon.  For this one I used two solid papers:


For this tag I used the same papers as the pocket.


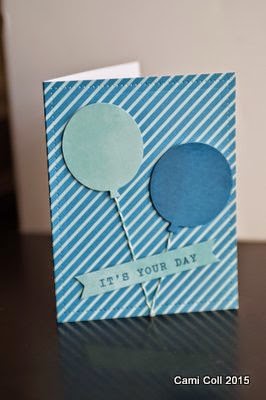
You can see that these pocket cards can be used for any occasion or theme.  Have fun!  Here are some more I've made lately...